Create a Custom Object Detection Model with Photos
2025-12-03 | By Hector Eduardo Tovar Mendoza
Object detection enables computers to recognize and locate objects in images, videos, or live streams, such as cars, people, or animals. But what if you don’t need a model that detects everything, and instead want it to recognize just one specific object? That’s where custom object detection comes in. By creating your own dataset and training a model with images you capture, you can teach it to focus exclusively on what matters to you, be it a product, a tool, or something entirely unique.
Tools You’ll Use
For this project, you will need the following:
- Roboflow: for organizing, labeling, and augmenting your images.
- YOLO (You Only Look Once): for fast and efficient object detection.
- Vscode (The code editor we will be using for this)
- Python (Any version, minimum 3.8)
- Computer (Windows, Mac, Linux)
- Webcam (Integrated in your computer or webcam)
Installation & tools
After installing VS Code, you must create a folder for this project. Then, go to the top bar, look for Terminal, and click on New Terminal. After this, at the bottom, you will see a terminal. There, write the following command:


The command:
- python (or python3) -m venv env
After doing this, you will see a folder called env. This is a virtual environment that helps you manage dependencies. The next step is to activate this environment:
- In Windows: ./env/Scripts/Activate.ps1
- In Mac/Linux: env/bin/activate

Now you'll see next to your command line in the terminal a green (env). This means the environment is activated. Now we must install the packages for this project.
The commands are:
- pip install opencv-python
- pip install ultralytics
Finally, create a file called main.py with the New File button in VS Code.

Preparing Your Dataset
The first step in building a custom object detection model is preparing your dataset. After signing in to Roboflow, start by creating a new workspace. You can name it however you like, and then select the free public plan to get started.

After that, we should create a new project you can do by clicking on the purple button.

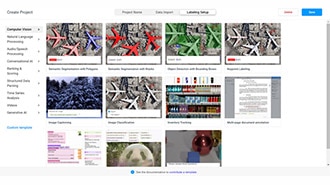
After clicking it, we shall see the following options. For this project, we must select object detection.

Now that we’ve created the model, the next step is to upload photos to build our dataset. For this project, I’ll cover the basics of labeling and annotation, but the main focus will be on recognizing pets, specifically dogs and cats. To make it more personal, I’ll also include my own pet, Fender, in the dataset.

You can obtain datasets from here. You must click on the black button and download it as a zip, then extract it.

Now, going back to the upload step, I added 30 photos (10 for each pet) that include dogs, cats, and of course, my own dog, Fender.

After clicking on Label Myself on the right side, a new UI will appear. Here, we need to select the Smart Polygon tool from the sidebar. This tool uses AI to speed up the labeling process by automatically detecting the object. It’s especially useful for simple shapes, though for more complex objects, other tools might be better. The best part? Smart Polygon is fast, accurate, and completely free!

Here, I simply clicked on my dog, and the tool automatically recognized the shape. In this case, it detected everything correctly, but if any parts were missing, you could just click on those areas, and the tool would try to add them. Similarly, if it includes extra areas you don’t want, a click will remove them.

At this stage, you’ll see an option on the left with a slider that lets you choose between Complex and Simple. This setting mainly matters if you’re training the model on your own GPU, since more points mean longer training times. Personally, I usually keep it in the middle for a good balance.

After clicking the green Enter button, you’ll see a section for Classes. Here, you can type the name of the object you’re annotating. For example, since I’m labeling my own dog, I’ll create a class called Fender. For other pets, we can keep it more general by using classes like Cat or Dog.

Here, you can see the points I mentioned earlier. In this example, I didn’t use manual annotation, but the points are shown as a reference. For this object, I labeled the class as Cat.

Now, for this image, I labeled it as a Dog.

Finally, once all the images are annotated, go to the top and click the green Confirm button. This will give you the option to add images to the dataset. After that, just press the purple button to complete the step.

After that, it will redirect you to the dataset, and then you’ll see all the photos annotated by you. Then, as the arrow indicates, click on it.

Then you’ll see this part where you can add more effects to each photo. For now, click on continue.

Next, you’ll reach the Augmentation section. This step is really helpful when your object appears in different environments, like bright or dim lighting. I usually apply adjustments to contrast, saturation, and brightness to make the model more robust.


Finally, the tool generates additional photos for your dataset. These are the same images but with different effects applied, such as increased brightness, higher saturation, and other adjustments I mentioned earlier.

Now you’ll see the final dataset, ready for training your model. At this stage, you can choose to train it yourself or use a platform like Roboflow. From my experience, training on your own requires a capable GPU like an NVIDIA 20 series or higher and around 16 GB of RAM, and a Linux environment such as Ubuntu 22.04. If you don’t meet these requirements, go to Testing and Using Your Model.

Training Your Custom Model on Your PC
For this step, based on my experience, you’ll need the following
- Laptop with a GPU such as RTX 20 series or higher
- Minimum of 16 GB RAM
- Linux distribution
- CUDA installed (link for installation)
Now, after having the previous requirements, we are going to export our dataset from Roboflow. For this, we need the following.
Open Visual Studio Code and create or open a folder—for example, mine is named training-model-tuto. Inside this folder, create a new file called model.ipynb. When you open it, VS Code may prompt you to install Jupyter. Simply accept the prompts and confirm the installations.

Jupyter notebooks are organized into blocks (or cells), where you can run code step by step. For our first block, let’s add the following code:
import torch
import cv2
from roboflow import Roboflow
import dotenv
import os
print("GPU Available:", torch.cuda.is_available())
!nvidia-smi
Now, after clicking on run the block we should see the following:

In the next block, we’ll export our dataset. To do this, simply add the following code in a new cell:
dotenv.load_dotenv()
rf = Roboflow(api_key=os.getenv("ROBOFLOW_API_KEY"))
project = rf.workspace(os.getenv("ROBOFLOW_WORKSPACE")).project(os.getenv("ROBOFLOW_PROJECT_ID"))
version = project.version(1)
dataset = version.download("yolov8")
Next, we’re going to use a .env file, which helps keep sensitive information—such as passwords or API keys—secure and separate from our main code. To set this up, create a new file named .env.

In this file, we only add these 3 variables
ROBOFLOW_WORKSPACE=
ROBOFLOW_API_KEY=
ROBOFLOW_PROJECT_ID=
So, how do we get these variables? In Roboflow, you’ll need to navigate to the following section:

When you click on the three dots, as shown in the image, you’ll see the option to copy the project ID. Copy it and paste it into the corresponding variable.
For the workspace, simply use the same name you chose when creating it earlier.
Finally, for the API key, make sure to use the private key. To find it, go to the left sidebar in Roboflow, open Settings, and look for the API Keys dropdown. There you’ll see both a public and a private key—copy the private key and add it to your .env file.


Then, after adding the variables to the .env file, we should go to the versions page in our project.

Next, go to Download Dataset and apply the same settings as shown in the example. Once you click Continue, a code snippet will be generated for you.

In our code block, we should add the following, which is the same as given by roboflow
dotenv.load_dotenv()
rf = Roboflow(api_key=os.getenv("ROBOFLOW_API_KEY"))
project = rf.workspace("larc-hbgqy").project("digikey-svcln")
version = project.version(1)
export_info = version.export("yolov8")
dataset = version.download("yolov8")
Click the Run button, and your dataset will be installed. Once it’s ready, create a new code block and add the following:
from ultralytics import YOLO
# Load the pre-trained YOLOv8n model.
# "n" = nano (fastest, lightest) -> good for low CPU/GPU.
# You can switch to "yolov8s.pt" (small), "yolov8m.pt" (medium),
# "yolov8l.pt" (large), or "yolov8x.pt" (extra large).
# ⚠️ If you have limited resources, keep "yolov8n.pt".
model = YOLO("yolov8n.pt")
# Train the model with the downloaded dataset
results = model.train(
   data="digiKey-1/data.yaml",  # Make sure the path points to your dataset
   epochs=50,                   # ↓ Lower this (e.g. 10–20) if training is too slow
   imgsz=640,                   # ↓ Reduce (e.g. 320 or 416) to save memory/CPU
   batch=4,                     # ↓ Decrease (e.g. 2 or even 1) if you get OOM errors
   perspective=0.0005,          # Data augmentation (safe to keep, but you can disable to speed up)
   scale=0.4,                   # Same as above
   translate=0.04,              # Same as above
   degrees=5,                   # Same as above
   shear=1,                     # Same as above
   hsv_s=0.5,                   # Same as above
   hsv_v=0.3,                   # Same as above
   flipud=0.2,                  # Same as above
   patience=15,                 # Early stopping patience (reduce if you want faster experiments)
   save_period=20,              # How often to save checkpoints (increase to save disk space)
   name="pet-model",            # Change to your preferred model name
   project="runs/detect",       # Training results folder
   exist_ok=True                # Overwrite previous runs if they exist
)
# NOTE: Training may take a while depending on your hardware.
Before running the block, open the newly created folder and edit the data.yaml file. Update the paths for train, test, and val as shown.
train: train/images
test: train/images
val: train/images
Since this is a quick demo model, we don’t need to use test or val, but for a more robust model, including them is highly recommended. After making these changes, click the Run button on the block to start training your model.
Training time can vary depending on your GPU; it may take anywhere from a few minutes to several hours. If you have a larger dataset, it will take longer. And if you’re using a laptop, make sure it’s plugged in to allow the GPU to run at full performance.

If it works, you should see the following output. For using your model as a webcam or just validating with photos, you can use the following code:
from ultralytics import YOLO
import cv2
# Load your trained model
model = YOLO("runs/detect/pet-model/weights/best.pt")
# ----------------------------
# 1) Run inference on a photo
# ----------------------------
def test_on_photo(image_path):
   results = model(image_path)  # quitamos show=True
   # Obtener el frame anotado (con las detecciones dibujadas)
   annotated_img = results[0].plot()
   # Mostrar en una ventana de OpenCV
  cv2.imshow("YOLOv8 Photo Detection", annotated_img)
   # Esperar a que presiones una tecla
   cv2.waitKey(0)
   # Cerrar ventanas
   cv2.destroyAllWindows()

# ----------------------------
# 2) Real-time detection (webcam)
# ----------------------------
def test_on_webcam():
   cap = cv2.VideoCapture(0)  # 0 = default camera
   if not cap.isOpened():
       print("❌ Error: Could not open webcam")
       return


   while True:
       ret, frame = cap.read()
       if not ret:
           print("❌ Failed to grab frame")
           break
       # Run YOLO inference on the frame
       results = model(frame)
       # Draw results on the frame
       annotated_frame = results[0].plot()
       # Show the frame
       cv2.imshow("YOLOv8 Detection (Press Q to quit)", annotated_frame)
       # Exit on pressing 'q'
       if cv2.waitKey(1) & 0xFF == ord("q"):
           break
   cap.release()
   cv2.destroyAllWindows()
# Example usage:
test_on_photo("fender.jpeg")
I’m using the test_on_photo function, so all you need to do is add the filename of the photo as an argument. When you run it, the function will display the result. This photo is new, meaning it wasn’t part of the dataset used for training.
Testing and Using Your Model
Now, using the roboflow training model, we can just click on the purple button and then press on the Roboflow Instant Model.

After a few minutes, the model finishes training, and you can start uploading new photos. In my case, I added some new images, and the model instantly recognized Fender, cats, and dogs. At this point, we have a well-trained model ready to detect our objects accurately.


In this project, we went through the entire process of creating a custom object detection model: uploading and labeling images, applying augmentations, generating additional dataset variations, and finally training the model. We saw how it can instantly recognize our objects, like Fender, cats, and dogs.
To build a really robust model, it’s important to take lots of photos and maintain standardization in the process, especially when applying augmentations. This helps the model handle different conditions, such as varying lighting, angles, or backgrounds.
I really encourage you to experiment with your own objects, from personal items to pets or anything unique you want your model to detect. The more diverse and well-annotated your dataset, the smarter and more reliable your model will become.